This post introduces how one can debug the entire system including system management mode (SMM) code with Windbg and Direct Connect Interface (DCI). As an example use case, we will debug the exploit of the kernel-to-SMM local privilege escalation vulnerability I reported.
For more details about the vulnerability and its implications, please refer to the GitHub repository. This post focuses on DCI and Windbg.
Summary
What is Direct Connect Interface?
Direct Connect Interface (DCI) is the Intel hardware provided debugging interface. It allows developers to debug the whole system without depending on a software provided debugging mechanism, such as Windows' kernel debugging subsystem and firmware (EDK2)'s Debug Agent.
As DCI is implemented by hardware, the debugger using this interface is capable of debugging a greater range of code including the reset vector and one that runs on the system management mode (SMM). This makes DCI an attractive tool for both developing and reverse engineering firmware, for example.
For a more comprehensive overview of the DCI technology, I strongly recommend taking time to watch the video from Intel and reading a document by the Slim Bootloader team:
- Introduction of System Debug and Trace in Intel® System Studio 2018
- Source Level Debugging with Intel(R) SVT CCA
Does my system support DCI?
DCI is available on Skylake (6th gen) or later and some of Atom and Xeon models. However, older generations support only a connection type called DCI OOB and require an expensive adapter, as shown in the below table.

If your target system is 7th gen or newer, DCI DbC is supported, and all you need to buy is a USB cable without the VBus. Buy ITPDCIAMAM1M or DataPro's one if the target system has the type-A USB port, or ITPDCIAMCM1M for the type-C USB port. I suggest buying both since I had a device that only worked with the type-C port.
If your target system is 6th gen, DbC is not supported, and you need to buy an expensive adapter called CCA (EXIBSSBADAPTOR). It is expensive but allows you to debug code even from the reset vector, which is not supported by DbC.
 |
| DCI connection types (from Debugging Intel Firmware using DCI & USB 3.0 by Intel) |
There is no notable requirement for the host system, and one can use a USB-C-to-A adapter if needed.
The complete list of supported models can be found in the release notes of Intel System Debugger, which we will be looking at shortly.
Is DCI enabled on the target?
If IA32_DEBUG_INTERFACE[0] is set, DCI is enabled. Use a kernel debugger or RWEverything to check this. For obvious reasons, DCI should be disabled by default on systems in the market. If not, report it to the OEM. It is a vulnerability (see CVE-2018-3652).

How can I enable DCI?
There is a couple of ways to do this: changing BIOS settings or patching NVRAM with RU.efi
BIOS settings
Very occasionally, BIOS settings offer an option to enable DCI. I have seen a couple of configuration names for this purpose as listed below. Enable them if available.
- CPU Run Control
- Enable HDCIEN
Patching NVRAM with RU.efi
The BIOS settings for DCI is often hidden in the production systems, but one can make the same effect as changing the settings by overwriting NVRAM storing the setting values. This is a bit involved process but explained in multiple articles as listed below. Here are the highlights of the steps.
- Extract BIOS using software like Chipsec
- Extract a module 899407D7-99FE-43D8-9A21-79EC328CAC21 ("Setup") with UEFITool
- Extract human readable representation of BISO menu implementation with IFR Extractor
- Find offsets of the following setting names and the value to set, as denoted with =>
- Debug Interface => Enabled (1)
- Debug Interface Lock => Disabled (0)
- DCI enable (HDCIEN) => Enabled (1)
- Platform Debug Consent => Enabled (DCI OOB+[DbC]) (1)
- CPU Run Control => Enabled (1)
- CPU Run Control Lock => Disabled (0)
- PCH Trace Hub Enable Mode => Host Debugger (2)
(Not all of them are found. It depends on BIOS)
- Download RU.efi, boot the system into UEFI shell and start RU.efi
- Alt+=, select "Setup", and change the found offset values. Commit changes and reboot.
References
- Enable/Disable IED (Intel Enhanced Debug)
- xDCI Support
For completeness, Intel Flash Image Tool (FIT) is another tool that can patch firmware and enable DCI. While I have never tried it yet, I heard recommendations of this tool from multiple sources.
How can I connect the target via DCI?


- Debugging EDK II Based Firmware Image Using Intel® System Debugger (Video)
- Source Level Debugging with Intel(R) SVT CCA
- User Guide - Starting and Finishing a Debugging Session
I recommend a legacy version of it for simplicity. It can be launched with
C:\Program Files (x86)\IntelSWTools\sw_dev_tools\system_debugger_2020\system_debug_legacy\xdb.bat
Tips for diagnosing connection issues
- Intel System Debugger Target Indicator is helpful to identify the possible cause. Make use of it

- Not all ports work. For example, one of my devices could be debugged only via the type-C port. Try different ports. Sometimes reboot and simply yanking and reconnecting the cable fixes an issue.
Intel Debug Extensions for WinDbg
The installer should have installed the extension that lets you debug the target with Windbg through DCI. To use the extension, the extended debug interface (EXDI) IPC COM server needs to be registered on the host with the following commands:
> regsvr32 ExdiIpc.dll
Then, reboot the host system.
Start the Intel System Debugger Developer Shell from the start menu and type "windbg_dci"

Once the connection is successfully established, type "windbg()"

Windbg should start, show disassembly and register values, and accept most of the commands like .reload if successful.


Debugging the system
Debugging the Windows kernel via DCI is functional but pointless unless using the kernel debugging is impossible. Instead, let us debug the SMM vulnerability exploit as an example use of the extension.
The SMM vulnerability and exploit
The vulnerability is that SMI 0x40 allows arbitrary SMRAM to be overwritten with 0x07. The exploit uses this primitive to overwrite a function pointer in the global variable referred to as SMST to achieve arbitrary code execution in SMM.The beautiful thing about SMST is that its address is leaked outside SMRAM by design. Ring0 code can search SMM core private data, which has the distinctive 'smmc' signature, from the UEFI runtime code region, then find the leaked pointer in it.
Address of SMST is leaked outside SMRAM

The exploit takes advantage of this and locates the address of the function pointer in SMRAM without depending on BIOS and system versions. For more details of the vulnerability and exploit, see the GitHub repository.
Debugging SMM and Shellcode with Windbg
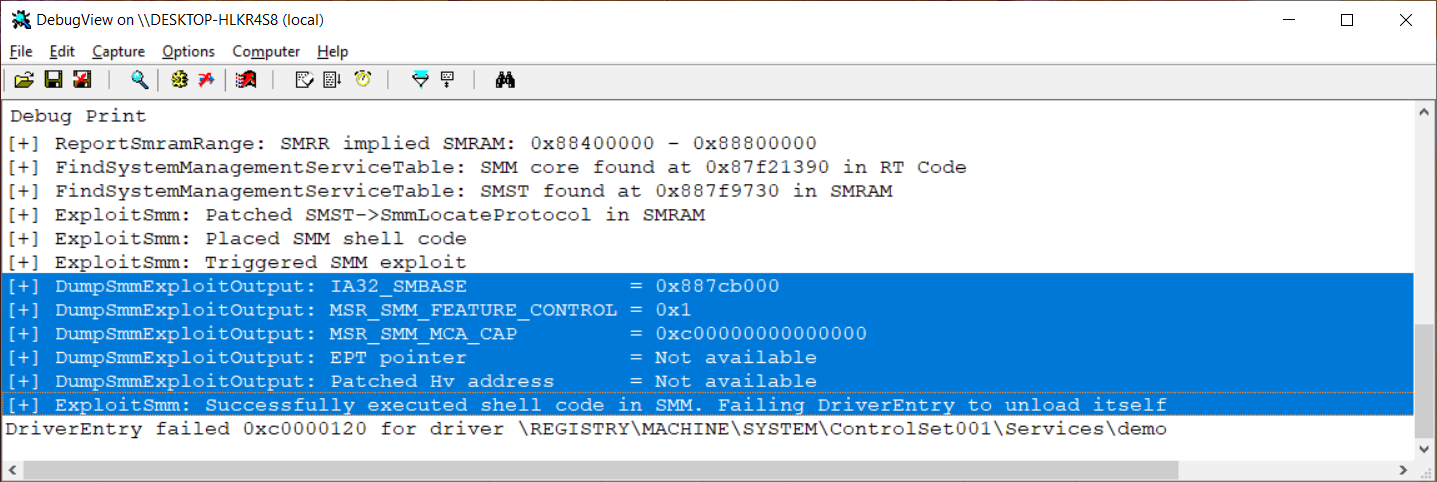
When the exploit is executed on a patched system, it debug-prints the range of SMRAM, addresses of SMM core and SMST, but fails to run the shell code.

- load symbols for the "dt" command, then
- break on SMM entry,
- extract and analyze SMRAM,
- set a breakpoint on the SMI 0x40 handler,
- debug and modify execution to simulate successful exploitation
First, break into the Windbg and set a breakpoint to one of NT APIs the exploit calls.
0: kd> bp nt!ExGetSystemFirmwareTable
0: kd> g
----
Then, rerun the exploit on the target system. Reload the symbol of the exploit once the target breaks into Windbg.
----...
ModLoad: fffff806`4d860000 fffff806`4d869000 \??\C:\Users\tanda\Desktop\demo.sys
Loading symbols for fffff806`4d860000 demo.sys -> demo.sys
0: kd> dt demo!SMM_CORE_PRIVATE_DATA
+0x000 Signature : Uint8B
On another windbg_dci session, enable the SMM entry break and resume the system. The system will break into the debugger again.
On the Windbg session, confirm that this is SMI 0x40 by checking RIP being 0x8000 and AL being 0x40. Then, dump the contents of SMRAM according to the range debug-printed by the previous run.
Download and run the SMRAM forensic script authored by Dmytro Oleksiuk (aka Cr4sh, @d_olex). This will show the address of the SMI 0x40 handler.
----$ wget https://raw.githubusercontent.com/tandasat/smram_parse/master/smram_parse.py
$ python3 smram_parse.py smram_88400000_88800000.bin
...
SW SMI HANDLERS:
...
0x88700110: SMI = 0x40, addr = 0x886e5c68, image = 0x886e5000
...
----
On the Windbg session, confirm the address looks correct. You can also find that the function refers to outside the SMRAM as highlighted in red. Let us run the target until there.
----0: kd> uf 0`886e5c68
00000000`886e5c68 4053 push rbx
00000000`886e5c6a 4883ec20 sub rsp,20h
00000000`886e5c6e 0fb704250e040000 movzx eax,word ptr [40Eh]
00000000`886e5c76 ba67000000 mov edx,67h
00000000`886e5c7b c605be12000001 mov byte ptr [00000000`886e6f40],1
00000000`886e5c82 c1e004 shl eax,4
00000000`886e5c85 0504010000 add eax,104h
00000000`886e5c8a 8b18 mov ebx,dword ptr [rax]
0: kd> g 0`886e5c8a
----
In the below disassembly, you can see that 0x104, outside the SMRAM, is referenced and contains the address to be overwritten minus 2 as colored in red. You can also find that subsequent code overwrites contents of the address as indicated by green. The address to be overwritten is highlighted in yellow.
0038:00000000`886e5c8a 8b18 mov ebx,dword ptr [rax] ds:0018:00000000`00000104=887f97fe
0038:00000000`886e5c8c 488bcb mov rcx,rbx
0038:00000000`886e5c8f e8bc0d0000 call 00000000`886e6a50
...
0038:00000000`886e5c9e c6430207 mov byte ptr [rbx+2],7 ds:0018:00000000`887f9800=8c
0038:00000000`886e5ca2 eb10 jmp 00000000`886e5cb4
----
How does the exploit compute this address? Remember that the exploit was able to find the SMM core private data at 0x87f21390. Let us "dt" the address to confirm that the SMM private core data is indeed present in the address, as well as the leaked address of SMST highlighted in yellow.
----
0: kd> db 0`87f21390 l10
00000000`87f21390 73 6d 6d 63 00 00 00 00-18 67 4f 84 00 00 00 00 smmc.....gO.....
0: kd> dt demo!SMM_CORE_PRIVATE_DATA 0`87f21390
+0x000 Signature : 0x636d6d73
+0x008 SmmIplImageHandle : 0x00000000`844f6718 Void
+0x010 SmramRangeCount : 3
+0x018 SmramRanges : 0x00000000`844f2d18 Void
+0x020 SmmEntryPoint : 0x00000000`887f9d7c Void
+0x028 SmmEntryPointRegistered : 0x1 ''
+0x029 InSmm : 0x1 ''
+0x030 Smst : 0x00000000`887f9730 EFI_SMM_SYSTEM_TABLE2
+0x038 CommunicationBuffer : (null)
+0x040 BufferSize : 0x20
+0x048 ReturnStatus : 0
+0x050 PiSmmCoreImageBase : _LARGE_INTEGER 0x1
+0x058 PiSmmCoreImageSize : 0xfffff806`53427320
+0x060 PiSmmCoreEntryPoint : _LARGE_INTEGER 0xfffff806`53427980
----
The exploit adds 0xd0 to the address of SMST since its layout is known. As shown below, the offset 0xd0 is the function pointer SmmLocateProtocol.
0: kd> db 0`887f9730 l10
0: kd> dt demo!EFI_SMM_SYSTEM_TABLE2 0`887f9730
+0x000 Hdr : EFI_TABLE_HEADER
+0x018 SmmFirmwareVendor : (null)
+0x020 SmmFirmwareRevision : 0
+0x028 SmmInstallConfigurationTable : 0x00000000`887fa1b0 Void
+0x030 SmmIo : EFI_SMM_CPU_IO2_PROTOCOL
+0x050 SmmAllocatePool : 0x00000000`887fb61c Void
+0x058 SmmFreePool : 0x00000000`887fb744 Void
+0x060 SmmAllocatePages : 0x00000000`887fbd20 Void
+0x068 SmmFreePages : 0x00000000`887fbe30 Void
+0x070 SmmStartupThisAp : 0x00000000`887e0af0 Void
+0x078 CurrentlyExecutingCpu : 0
+0x080 NumberOfCpus : 4
+0x088 CpuSaveStateSize : 0x00000000`887ddd50 -> 0x400
+0x090 CpuSaveState : 0x00000000`887ddf50 -> 0x00000000`887dac00 Void
+0x098 NumberOfTableEntries : 6
+0x0a0 SmmConfigurationTable : 0x00000000`887e5810 Void
+0x0a8 SmmInstallProtocolInterface : 0x00000000`887fb928 Void
+0x0b0 SmmUninstallProtocolInterface : 0x00000000`887fbaf4 Void
+0x0b8 SmmHandleProtocol : 0x00000000`887fbc1c Void
+0x0c0 SmmRegisterProtocolNotify : 0x00000000`887fbf2c Void
+0x0c8 SmmLocateHandle : 0x00000000`887fa058 Void
+0x0d0 SmmLocateProtocol : 0x00000000`887f9f8c Void
+0x0d8 SmiManage : 0x00000000`887fb2fc Void
+0x0e0 SmiHandlerRegister : 0x00000000`887fb3d4 Void
+0x0e8 SmiHandlerUnRegister : 0x00000000`887fb48c Void
----
So, the SMI 0x40 would have been about to overwrite the contents of the SmmLocateProtorol field.
Since the code we are debugging is no longer vulnerable, let us emulate successful exploitation by changing the RIP to the MOV instruction. After stepping through the instruction, we can confirm the contents of the address highlighted in yellow was changed to 0x07.
----00000000`887f9800 00000000`887f9f8c
0: kd> r rip=0`886e5c9e
0: kd> t
0: kd> dp 0`887f9800 l1
00000000`887f9800 00000000`887f9f07
----
After repeating this step 4 times, the address is overwritten to 0x07070707, outside the SMRAM.
----0: kd> dp 0`887f9800 l1
00000000`887f9800 00000000`07070707
0: kd> dt demo!EFI_SMM_SYSTEM_TABLE2 0`887f9730
...
+0x0c8 SmmLocateHandle : 0x00000000`887fa058 Void
+0x0d0 SmmLocateProtocol : 0x00000000`07070707 Void
----
Let us run the target one more time to verify successful exploitation. The next SMI is 0xdf, which will call SmmLocateProtocol.
----0: kd> g
Break instruction exception - code 80000003 (first chance)
cb00:00000000`00008000 bb9180662e mov ebx,2E668091h
0: kd> r
rax=00000000000000df rbx=0000000000000000 rcx=fffff8064d544180
rdx=ffffed842b8400b2 rsi=ffff808cd68ff000 rdi=ffff808cd521e7c0
rip=0000000000008000 rsp=000000002b8476e0 rbp=0000000000000000
r8=0000000000000001 r9=ffff808cd7345040 r10=6c6c656873204d4d
r11=ffff808ccc4901e8 r12=ffffffff80002b6c r13=0000000000000002
r14=fffff8064d8652f8 r15=ffff808cd68ff000
...
0: kd> bp 0`07070707
0: kd> g
Breakpoint 0 hit
0038:00000000`07070707 90 nop
🎉 As expected, the target breaks into the debugger at 0x07070707. Once the shell code is executed, its output stored at 0x0 can be checked.
Hopefully, you find the combination of DCI and Windbg interesting.
Resources
Tips for general debugging with DCI
- Make the target system single core with bcdedit. I found debugging multi-core configuration is unusably unstable.
- Fully disable Hyper-V on the target before debugging. Hyper-V will crash the system with synthetic watchdog bugcheck, even if VBS is disabled.
- DCI offers break-on-VM-exit/entry but I could never make it work. Do not waste time but also let me know if it worked for you.
Tips and references for reverse engineering SMM with DCI
- SMI is handled by the following functions in EDK2. Your system can very well be the same.
- Neither Windbg nor Intel System Debugger correctly displays 16-bit mode code at the beginning of SMM. Just continue single stepping until around offset 0x90.


- UEFI BIOS holes. So Much Magic. Don’t Come Inside (Slides)
- Tapping into the core (Slides)
- UEFI Exploitation For The Masses (Slides)
- “EVIL MAID” FIRMWARE ATTACKS USING USB DEBUG
Others
- Open Source Firmware explorations using DCI on the AAEON UP Squared board
- Enabling DCI on UP Squared. The most detailed step-by-step instructions for the device. Excellent blog.
- 使用DCI EXDI会话调 试Windows内核 (Chinese)
- Reverse engineering Windows using DCI and Windbg
- Exploiting AMI Aptio firmware on example of Intel NUC
- About the same vulnerability and SMRAM forencits
- C:\Program Files (x86)\Windows Kits\10\Debuggers\x64\sdk\samples\exdi
- for EXDI. This includes Windbg-gdb-VMware bridge called ExdiGdbSrvSample.
Acknowledgement
- Researchers published their work around DCI/SMM, in particular, Dmytro Oleksiuk (@d_olex) and Mark Ermolov (@_markel___)
No comments:
Post a Comment